

 English
 русский
 Español
 Français
 عربى
عربى 简体中文
简体中文
How Does a Stool Mould Shape Plastic Seating Production
2026-04-03
How Tooling for Plastic Seating Influences Manufacturing Results
Plastic seating pieces have become a go-to option in homes, offices, and public spots alike. They're tough, easy to clean, and handle daily use without much fuss. When it comes to turning out these items on an injection molding line, the tooling you pick and how you handle it can quietly make or break your daily output. It affects everything from how the plastic flows and cools to how consistent the parts look and how long the equipment keeps running before it needs attention.
Over the years, shops that produce these seating items learn that paying attention to a few core areas really helps keep things steady. This piece walks through some of those areas in plain terms: how the tooling gets configured in the first place, what actually drives its day-to-day performance, ways to pick something that fits your setup, thoughts on building a custom version, the role of the feed system, and simple steps for keeping it in good shape. The goal isn't to overwhelm you with theory but to share practical points that many production teams run into and figure out along the way. Where it makes sense, we'll touch on Stool Mould specifics so you can see how they fit into the bigger picture.
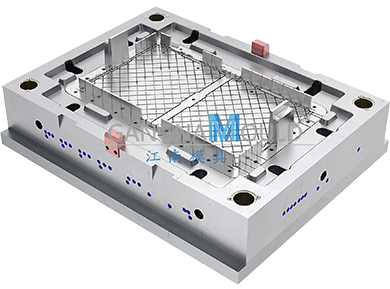
Why Tooling Configuration Matters in Plastic Injection Processes
Think about the moment the plastic shoots into the cavity. The way the tooling is laid out decides whether that material spreads evenly or runs into trouble. For seating with flat tops and those supporting legs, a smart configuration keeps the flow balanced and spreads heat in a way that avoids thin spots or slight bends once the part cools. In practice, a lot of shops notice that getting the Stool Mould configuration right from the start leads to smoother cycles and parts that drop out looking more uniform.
Ejection is another spot that can trip you up if it's overlooked. Seating pieces often have ribs or textured undersides, so the release system needs to push them free without leaving marks or causing them to stick. Draft angles play their part too. Those small tapers let the tool open cleanly as the plastic shrinks, cutting down on resistance and helping the whole process repeat reliably over thousands of shots. Many teams sit down with the drawings early, spotting possible flow hang-ups before any steel gets cut. It saves headaches later when you're trying to hit production numbers. In the shop, this kind of upfront work means operators spend less time fixing issues and more time keeping the line moving.
What Elements Shape the Performance of Tooling for Seating Production
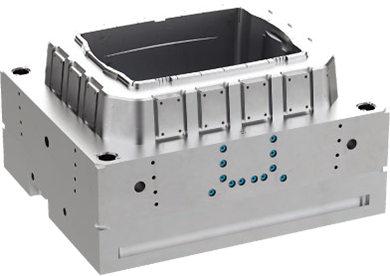
Plenty of things come together to decide how well the tooling holds up shift after shift. The steel grade you choose for the main blocks influences how it stands up to heat and pressure over time. Some grades wear slower around high-stress areas like the gate or parting line, which means you might go longer between touch-ups. Cooling channels matter a lot too. When they're placed so coolant moves evenly, the seating parts solidify more consistently and come out with steadier dimensions.
Strength of the overall structure counts as well. The core, cavity inserts, and support plates have to take the clamping force without flexing too much. Too much give and you start seeing flash or uneven walls, especially in the leg sections that take the real load when someone sits down. Surface finish inside the cavity also affects how easily the part releases and what it looks like fresh out of the tool. Stool Mould performance tends to stay more predictable when all these pieces get balanced attention during the build.
Most shops run a few trial shots and watch cycle times, part weights, and any early wear signs. Keeping a simple log helps spot patterns before they turn into bigger stops. Over time, this kind of close watching lets you plan maintenance instead of reacting when the line suddenly slows down. It's one of those quiet habits that separates steady runs from constant firefighting.
How to Select Tooling That Fits Your Manufacturing Requirements
Picking the right tooling starts with a clear look at what your machines can actually handle and what kind of volumes you're chasing. You check clamp tonnage and shot capacity first so the tool doesn't fight the press. A mismatch there can mean incomplete fills or extra wear on both sides. Cavity count is another call. Some lines do better with a single-cavity setup when designs change often or batches stay small. Others go multi-cavity when the order book is full and steady. The trick is finding the sweet spot that keeps changeovers quick without sacrificing output.
Resin flow and shrinkage behavior guide the choice too. The plastics commonly used for seating need to move smoothly, and the tooling has to match their cooling needs. Many managers put together a quick checklist: machine specs, part sizes, target cycle times, and quality points. They also talk through how the final seating will be used—indoor only, outdoor exposure, or stacked regularly—so the tool can include the right details without overcomplicating things. Stool Mould selection gets easier once you map these requirements out on paper.
Taking the time here usually pays off in fewer surprises once production starts. Factories that do this step carefully often report smoother daily runs and less scrambling when they switch between product styles.
What to Keep in Mind When Creating Custom Tooling for Seating Items
Building custom tooling begins with good drawings and a solid idea of how the plastic will behave once it's in the press. You share dimensions, any stacking features, and places that need extra strength. The tooling maker then works out the cavity and core layout to match. Flow simulation at this stage helps catch potential fill issues early. Small tweaks to wall thickness or rib placement can prevent weak lines or voids without changing the overall look of the seat.
Cooling gets planned around the geometry too, especially in thicker areas that take longer to set. Regular back-and-forth with the supplier keeps things on track. If something looks tricky for ejection or parting, you catch it before the steel is fully cut. Trial shots with early samples give real feedback that you can use to refine the design. Stool Mould development works best when operators who will actually run the tool get a chance to add their input. They often spot practical details that improve daily handling without adding extra steps.
This custom route lets you match specific market requests while still staying within standard injection practices. Many teams say the extra conversation upfront leads to tooling that simply works better in real production conditions.
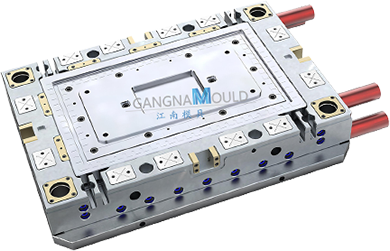
How Feed System Configuration Influences Results in Seating Tooling
Where and how the plastic enters the cavity makes a bigger difference than it might seem. The feed system—whether edge, fan, or tunnel style—shapes the fill pattern and the final surface look. Placement matters because you want to keep any small witness marks away from visible areas like the seat top. In multi-cavity tools, balanced delivery keeps every part filling at roughly the same rate so weights and dimensions stay close across the shot.
Gate size also controls injection speed and pressure. When it's dialed in right for the resin and part volume, you get complete fills without extra heat that could affect material strength. Operators often watch fill times and part quality during startup and make small adjustments if needed. Sometimes a minor change to runner size during a maintenance window brings noticeable improvements in material use and cycle consistency. Stool Mould feed systems that are set up thoughtfully tend to keep scrap lower and help the line run more predictably through the day.
Teams that experiment a bit with these details usually find tweaks that fit their particular resin and part shape without needing a full redesign.
Practical Advice for Ongoing Care of Your Tooling
Keeping the tooling in shape doesn't have to be complicated, but it does need to be regular. After runs, a quick clean removes leftover plastic from cavities, runners, and vents. The right cleaning agents keep the surfaces intact without dulling them. Moving parts like the ejector pins to get a light lubrication on schedule so they slide freely and those don't cause sticking or uneven release.
Periodic checks on alignment and key dimensions also catch small shifts before they show up in the parts. Polishing a worn area or touching up a gate can restore performance without major downtime. Cooling lines benefit from occasional flushing to keep heat transfer steady. When the tool sits idle, a protective coating and dry storage help prevent rust or dust buildup that could affect the finish later.
Operators who know what to watch for—changes in cycle sound, part appearance, or slight slowdowns—can flag issues early. A simple maintenance log turns into a useful record that helps you plan ahead instead of guessing when service might be needed. Stool Mould care routines that follow a steady schedule often mean longer service life and fewer surprise stops on the line.
Looking at configuration, selection, custom work, feed setup, and regular care together gives a solid picture of how to support reliable results in plastic seating production. Shops that keep these points in mind tend to run more consistently and keep costs steadier over time. The real value comes from reviewing your own setup against actual needs and making small improvements where they count most.
If you're looking at tooling options for plastic seating, feel free to get in touch. As specialists in this area, we can talk through what might fit your production line and share details based on your requirements. Reach out anytime for a conversation or more information.
Previous Post
How Can a Stool Mould Make Your Workshop Flow Smoother
Next Post
Can a Coating Barrel Mold Boost Production
Our Products.
Quick Links
Contact Information
- ADD: No. 268, Jinchuan Road, Xinqian Street, Huangyan District, Taizhou City, Zhejiang Province, China
- TEL: +86-(0)576-89191888
- E-MAIL: gm@gangnammould.com
Mobile
Copyright © Zhejiang Huangyan Jiangnan Mould Factory All Rights Reserved.

PP Mould
